Creating treats that bring people together is incredibly joyful. I remember making homemade cake pops with my family. Our kitchen was filled with laughter and flour dust.
Those little orbs, covered in chocolate and sprinkles, became our go-to for celebrations. Cake pops are not just pretty—they’re little pieces of joy that brighten any day.
Easy cake pops recipes have become very popular. They let you customize them endlessly. I’m excited to share my favorite cake pops recipe from scratch with you.
This guide will teach you how to make moist, tasty cake pops. You won’t need frosting or complicated steps. I’ll show you how to make these treats perfect for any occasion.
Introduction to Cake Pops
Cake pops are small, round cakes on sticks that everyone loves. They started as a way to use leftover cake. Now, they’re a favorite dessert for all ages.
To make cake pops, you need some basic tools. You can find cake pop sticks at stores like Target and QFC. A 9×13 cake pan is needed for baking. Styrofoam blocks for cooling are optional. Melting chocolate is easy with a microwave, making it simple for home bakers.
Flavor options for cake pops are endless. You can mix Red Velvet Cake with Cream Cheese Frosting or White Chocolate with Strawberry Frosting. Using a boxed cake mix with the right frosting is a great way to start.
How many cake pops you can make is interesting. A small ice cream scoop can make 30 cake balls per cake. Hand-rolling can make 50 quarter-sized balls, even shapes like hearts or stars. Freezing the cake pops for thirty minutes before dipping is key to keeping their shape.
Making cake pops takes time and patience. Dipping can take about an hour for beginners. Decorating also takes time but gets faster with practice. Cake pops can stay fresh in the fridge for over ten days or frozen for up to nine months.
Why Make Cake Pops from Scratch?
Making cake pops from scratch has many benefits. It lets me choose the best ingredients for richer flavors. This way, I avoid using box mixes or canned frosting, making my dessert unique.
For beginners, cake pops are a fun project. They offer endless possibilities for flavors, designs, and decorations. Whether it’s for a holiday or a birthday, cake pops can be tailored to any event. I can even use food colorings to match the theme.
My recipe makes about 50 cake pops in just an hour. It’s amazing to see how a simple mix turns into tasty treats. Plus, they can be frozen for up to three months, which is a big plus.
Each cake pop has about 243 calories, making them a sweet treat. With the right tools and ingredients, making cake pops is easy. Following the steps, I always get delicious results.
| Feature | Details |
|---|---|
| Yield | Approximately 50 cake pops |
| Prep Time | 1 hour |
| Freezer Life | Up to 3 months |
| Calories per Serving | 243 calories |
| Coating | 2 cups of white chocolate |
| Baking Temperature | 350º F for 30-40 minutes |
| Icing Ratio | ¾ cup cocoa to 1 cup boiling water |
| Frosting Ingredients | 1 cup of butter and 4 cups of powdered sugar |
Essential Ingredients for Cake Pops
When making cake pops, the ingredients you choose are key. They affect how tasty and good-looking your treats will be. I always pick the best ingredients for the cake and frosting.
For the cake, I use:
- All-purpose flour
- Baking powder
- Sugar
- Eggs
- Butter
- Vanilla extract
The frosting gets its sweetness and creaminess from:
- Confectioners’ sugar
- Heavy cream
- Additional vanilla extract
The chocolate coating, whether regular or candy melts, makes the pops look great. It also adds a nice crunch. Fresh ingredients are important for moist and flavorful cake pops.
This recipe makes 38 cake pops. Here’s what you need:
| Ingredient | Amount |
|---|---|
| Vanilla cake mix | 1 box (15.25 ounces) |
| Water | 1 cup |
| Vegetable oil | ½ cup |
| Eggs | 3 |
| Frosting | 1 cup |
| Candy melts or chocolate melting wafers | 12 ounces |
| Lollipop sticks | 38 |
| Sprinkles | As desired |
With these ingredients, I can make cake pops that look amazing and taste great. They’re perfect for any event.
Step-by-Step Cake Pops Recipe from Scratch
Making cake pops is a fun process. First, we’ll make a homemade vanilla cake. This cake is the base for your treats. It’s important to get the flavor and texture right for delicious cake pops.
Let’s start with the cake. Then, we’ll make a vanilla buttercream frosting to go with it.
Making the Vanilla Cake
To make the cake, you’ll need:
- 1 cup all-purpose flour
- ½ teaspoon baking powder
- ½ teaspoon baking soda
- ⅛ teaspoon salt
- ¼ cup butter
- ½ cup granulated sugar
- 1 egg
- 1 teaspoon vanilla extract
- ½ cup whole milk
Preheat your oven to 350°F (175°C). Grease an 8-inch round baking pan. Mix the dry ingredients in one bowl.
In another bowl, cream the butter and sugar until fluffy. Beat in the egg and vanilla extract. Then, mix in the dry ingredients and milk.
Put the batter in the baking pan and bake for 25-30 minutes. The cake is done when a toothpick comes out clean. Let it cool completely before moving on.
Preparing the Vanilla Buttercream
After the cake cools, it’s time for the buttercream. You’ll need:
- ¼ cup unsalted butter
- ⅔ cup icing sugar
- 1 teaspoon whole milk
- ½ teaspoon vanilla extract
Beat the butter until smooth. Add the icing sugar slowly to get a fluffy mix. Mix in the milk and vanilla for flavor.

Now, you have the cake and buttercream ready. You’ll make about 18-20 cake pops. They’re sure to impress everyone. Don’t forget to check back for the next steps.
This recipe has a 4.9 out of 5 star rating from 8 reviews. It’s a favorite! Serve these treats chilled or at room temperature. You might become the go-to person for cake pops.
For more great recipes, check out here.
Crumbling the Cake and Mixing
After my cake cools, I start crumbling it into fine pieces. This is key for my cake pops recipe. Crumbling by hand lets me control the texture and avoid too many balls at once. I mix the cake with frosting, using about 1/3 of a can, to get the right balance.
To check if the mix is right, I squeeze it in my hand. It should hold its shape well. This ensures the balls are moist but not soggy. I also use leftover cake scraps to make these treats even better.
After rolling the cake balls, I chill them for at least 45 minutes. This step is vital to prevent them from falling apart later. Dipping them in melted candy melts right after chilling helps them keep their shape.
It’s important to melt chocolate correctly for smooth coatings. I follow the package instructions to avoid clumps. If the chocolate is too thick, adding a bit of oil helps it flow better. These steps help me make amazing cake pops from scratch.
Forming Perfect Cake Balls
Making cake balls round is key for a neat look in my easy cake pops recipe. I crumble the cake and mix it with frosting. Then, I shape them into balls, about 1 1/2 inches big. This step is important for the cake pops’ look.
Chilling the Cake Balls
Chilling the cake balls is vital for dipping. I put them on a tray lined with parchment paper and chill them for at least two hours. This keeps them firm and makes dipping easier. Here’s a quick overview:
| Step | Description | Duration |
|---|---|---|
| Crumble Cake | Crumble a 9″x13″ cake into fine crumbs. | 5 minutes |
| Mix with Frosting | Combine cake crumbs with 2 tablespoons of frosting until a soft consistency forms. | 5 minutes |
| Shape Balls | Roll mixture into small, uniform balls. | 15 minutes |
| Chill | Refrigerate formed balls to set before dipping. | 2+ hours |
These cake balls last 5-7 days in a sealed container. If you chill them, they last up to 10 days. Try different flavors like lemon or chocolate for fun. Use a cake pop former or cookie scoop for even shapes. After chilling, they’re ready for dipping.

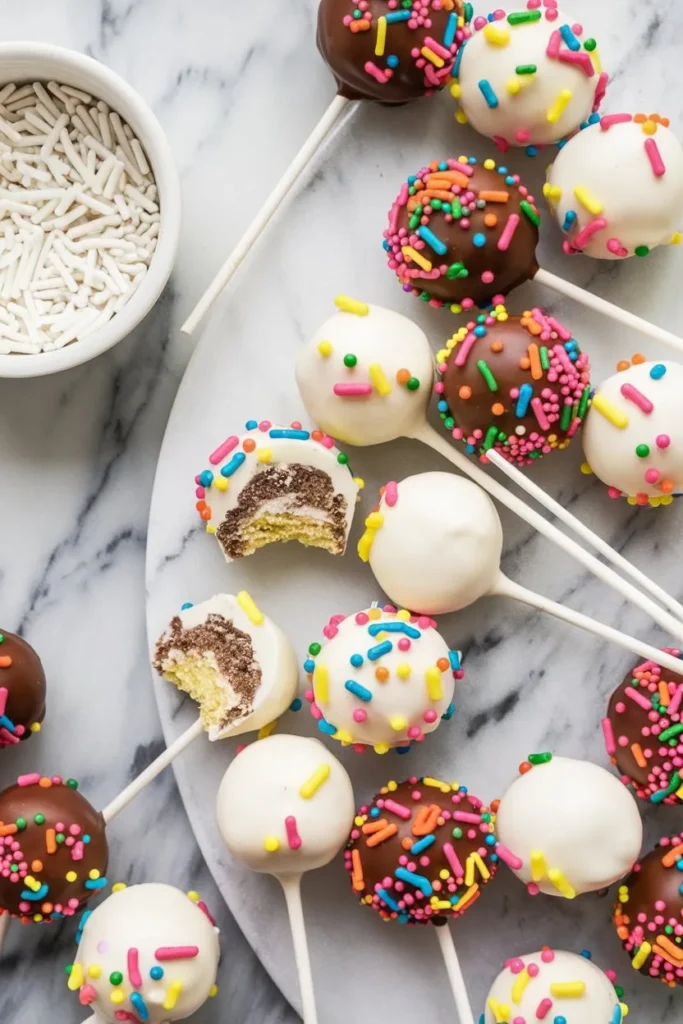
Dipping Cake Pops in Chocolate
Dipping is key to making stunning cake pops. Use candy melts or semi-sweet chocolate bars for the best look. Start by melting your chocolate in a bowl safe for the microwave. Heat in short bursts, stirring often to keep it smooth.
When dipping, avoid too much chocolate. Use a fork or dipping tool to coat the cake ball. This helps remove excess chocolate. Also, dipping the lollipop stick in chocolate before adding it to the cake ball helps it stick better.
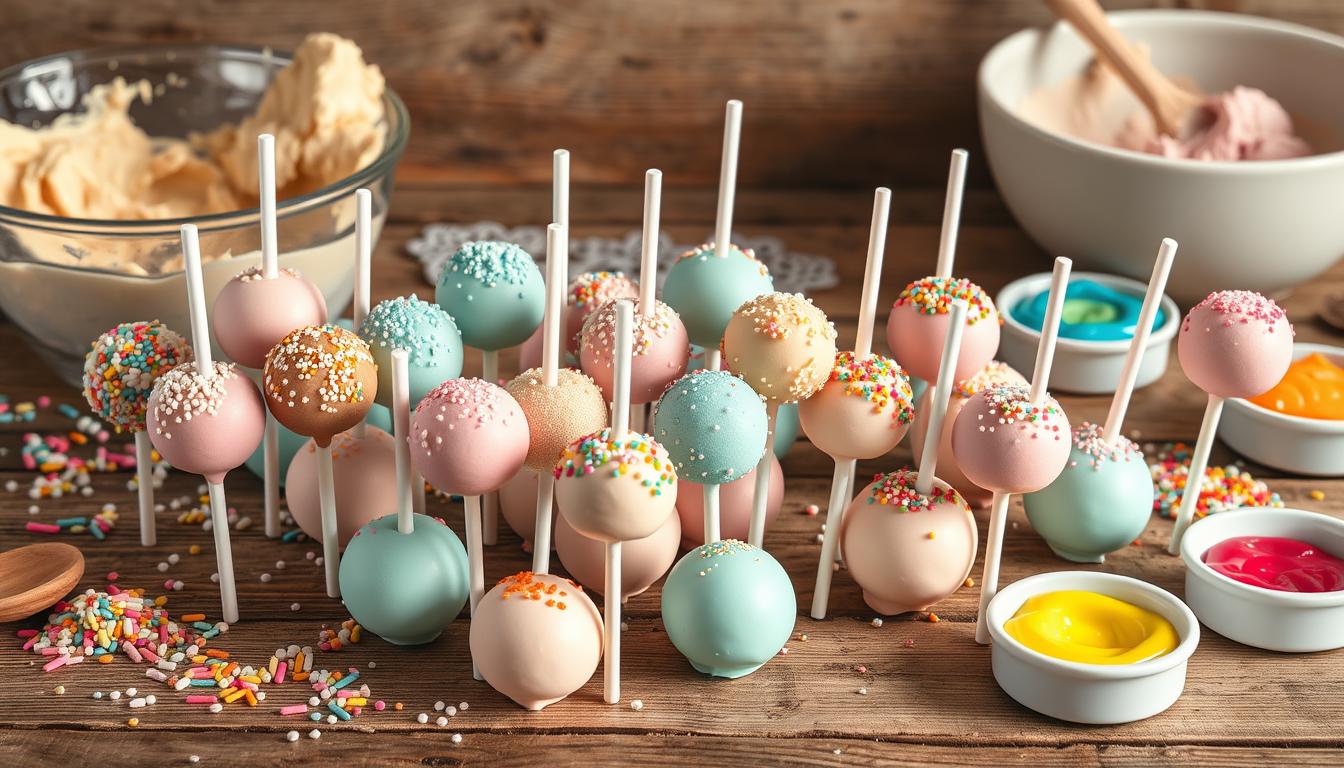
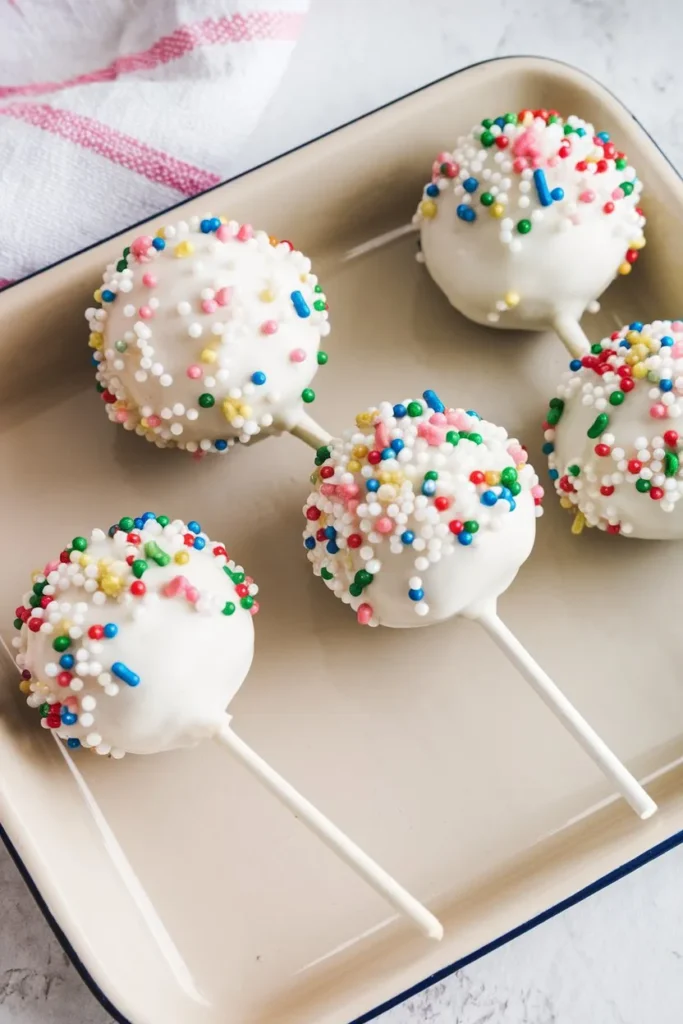
For a clean finish, let the chocolate drip off before setting the pops upright. Use a styrofoam block or box to hold the sticks. Decorate with sprinkles or drizzles before the chocolate hardens. This makes them look great and adds fun texture.
For the best taste, eat your cake pops within an hour. This best cake pops tutorial will help you make delicious and beautiful treats. They’re perfect for any celebration.
| Ingredient | Amount |
|---|---|
| All-Purpose Flour | 1 cup |
| Granulated Sugar | 1 cup |
| Unsweetened Cocoa Powder | 6 tablespoons |
| Candy Melts or Chocolate Bars | Varies |
| Sprinkles | As needed |
Decorating Your Cake Pops
After the chocolate sets, it’s time to decorate your cake pops. This is where you can get creative and make them special for any event. I love using different toppings to make my cake pops unique.
Here are some fun decorating ideas:
- Colored sugars and edible glitters for a sparkling effect.
- Drizzled white chocolate or colored chocolate to create eye-catching designs.
- Candy sprinkles in assorted shapes and colors to add texture and fun.
For a touch of elegance, pair cake pop flavors like Chocolate Mania or Red Velvet with matching toppings. A light dusting of powdered sugar can also make your dessert look fancy.
Using lollipop sticks makes it easy to handle and display your cake pops. You can find these sticks at craft stores like Michael’s or JoAnn’s, which have a wide selection.
Don’t be afraid to try new flavors and colors. Mixing gel food coloring into the frosting can give you bright colors. The frosting recipe makes about 4 cups, perfect for trying out different shades.
If you need more ideas or inspiration, check out the cake pops guide. It has tips and tricks from over 12 years of making cake pops. So, let your imagination run wild and make beautiful, delicious cake pops that will wow everyone at your next event!
Storage Tips for Cake Pops
Keeping cake pops fresh is key for beginners. They stay tasty and delightful with the right care. At room temperature, they last a week. Refrigeration can extend this to two weeks or more.
Freezing is great for longer storage. It keeps them fresh for about three months. To avoid cracking, let them sit at room temperature for an hour after freezing.
Store them in an airtight container, if they have delicate decorations. This helps keep their quality and prevents color bleeding.
When giving or moving cake pops, keep them about 0.32 cm or ⅛ inch apart. This prevents damage during transport. Make sure they are dry before wrapping or packing.
These tips are essential for beginners. They help keep cake pops delicious and intact. By following these steps, you can enjoy or share your homemade treats confidently.
For more storage ideas, check out this link.
Conclusion
Making cake pops from scratch is a joy. It turns simple ingredients into beautiful treats. This recipe lets us get creative and bond with loved ones.
Every step, from crumbling the cake to dipping it in colors, shows our unique style. It’s a chance to express ourselves.
Cake pops DIY offers endless possibilities. You can pick bright candy coatings or try new designs. This recipe makes 48 cake pops, perfect for sharing.
With practice, anyone can make stunning cake pops. They will impress everyone who sees them.
Let’s dive into making cake pops together. Enjoy the journey and let your creativity shine. Your cake pops will delight everyone’s taste and eyes.
Source Links
- Homemade Cake Pops – https://cookiesfordays.com/cake-pops/
- Easy Cake Pop Recipe – I Heart Naptime – https://www.iheartnaptime.net/cake-pops/
- Making Cake Pops (the Easy Way) – https://www.instructables.com/Making-Cake-Pops-the-Easy-Way/
- Cake Pops – https://sugarspunrun.com/how-to-make-cake-pops/
- Made from Scratch Cake Pops – https://mincedblog.com/2014/01/21/made-from-scratch-cake-pops/
- Cake Pops Made from Scratch – https://www.artandthekitchen.com/cake-pops-made-from-scratch/
- Cake Pops – https://preppykitchen.com/cake-pops/
- Easy Cake Pops – Cakes by MK – https://cakesbymk.com/recipe/easy-cake-pops/
- Vanilla Cake Pops from Scratch – https://www.aheadofthyme.com/vanilla-cake-pops-from-scratch/
- Cake Pop Recipe {Better than Starbucks} – The Big Man’s World ® – https://thebigmansworld.com/cake-pop-recipe/
- Cake Balls: How To Turn a Fail Cake into a Delicious Dessert – https://rhythmtang.wordpress.com/2014/03/01/cake-balls-how-to-turn-a-fail-cake-into-a-delicious-dessert/
- Cake Pops – how to make the best ever! — Popcosmo – https://www.popcosmo.com/blog/2012/06/25/cake-pops-tutorial
- Cake Balls Recipe – https://www.dinneratthezoo.com/cake-balls-recipe/
- How to Make Cake Pops (easy and fool-proof) – https://simplyhomecooked.com/how-to-make-cake-pops/
- Chocolate Cake Pops (Recipe + Video) – Sally’s Baking Addiction – https://sallysbakingaddiction.com/chocolate-cake-pops/
- Chocolate Covered Cake Pops – https://www.urbancookery.com/chocolate-covered-cake-pops/
- How To Make Cake Pops – https://www.thekitchn.com/how-to-make-cake-pops-cooking-lessons-from-the-kitchn-78637
- Homemade Cake Pops Are Easier Than You Think – https://www.simplyrecipes.com/how-to-make-cake-pops-5324876
- How to Store Cake Pops (3 Methods) | Cake Girls – https://thecakegirls.com/how-to-store-cake-pops.html
- How to Store Cake Pops (the Right Way!) – https://www.tasteofhome.com/article/how-to-store-cake-pops/?srsltid=AfmBOorUM2kGycaS-wmKdG1YLwx73xVrfrcLx8ngx-Ts4qx5zAzvYabD
- How To Store Cake Pops: The Best Ways And Easy Tips – https://chopnotch.com/how-to-store-cake-pops/
- Halloween Cake Pops – Recipe Snobs – http://recipesnobs.com/2011/10/23/halloween-cake-pops/
- The Complete Guide to making Cakesicles – https://www.sugarologie.com/recipes/complete-guide-to-making-cakesicles
- The New Idea of Cake Pops! – http://www.jenniferscakes.co.uk/the-new-idea-of-cake-pops/